How To Install a Skylight On A Shingle Roof
Commercial and industrial buildings install different features that improve the overall functionality and productivity of everyone inside. One example of a feature you can add is a VRF system that’s twice as strong and effective as an HVAC system. Another one is replacing old electrical systems with ones that can provide energy efficiency. Why not do the same for your home? Adding a skylight to your home
is a fantastic way to upgrade your living space and bring the beauty of the outdoors inside. If you are looking to revitalize your home while reducing energy costs, learning how to install a skylight on a shingle roof is a project well worth the effort.
Installing skylights on a shingle roof increases natural light and improves energy efficiency. When you install a skylight, it reduces reliance on electricity and makes any home feel more inviting. Proper skylight installation requires accurate measurements and correct flashing to prevent leaks. Adding multiple skylights can drastically change the ambiance of a kitchen or living room.
Understanding the skylight install process is critical for long-term performance. From preparing the rough opening to sealing the skylight, every step ensures weather resistance. Using the right skylights for your roof pitch is the first step toward success. Expert tips can guide you through a professional skylight installation process to avoid common mistakes.
Before starting a DIY skylight installation project
Preparation is essential before beginning any work. Installing overhead windows requires a clear understanding of roof structure, layout, and safety requirements. Without proper planning, mistakes can lead to leaks or unnecessary repairs. This is why professional roofing experience or guidance is recommended before installing any overhead feature to protect your home.
Some of the things we prepare in a professional skylight installation before beginning the skylight project include:
Experience and Planning for Skylight Projects
Experience plays a major role in project success. Individuals familiar with construction tools and roofing systems are better equipped to measure accurately and work efficiently. Precision is especially important when making a cut into existing materials. A clean cut helps preserve surrounding structure and prevents costly corrections to the roofing.
Skilled workers know when and where to place components for maximum support. Proper planning ensures materials align correctly and remain stable under changing weather conditions. This attention to detail directly impacts overall installation quality and the lifespan of the skylights you choose to install.
Extra Help to Install a Skylight Safely
Additional assistance is necessary due to the size and weight of the skylight. Attempting to handle it alone increases safety risks and alignment issues. Extra hands make it easier to place the skylight securely without damaging nearby roofing materials.
Team coordination helps keep the skylight frame level while securing fasteners. This step reduces strain on the structure and ensures long-term stability. Proper teamwork supports both safety and performance during the skylight installation process.
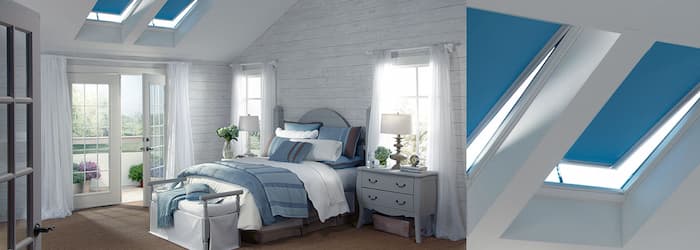
Choosing the Right Skylight for Your Home
You can never start the installation project without the skylight. Make sure you look for a trustworthy company that sells high-quality skylights so that they won’t have any issues or imperfections. One skylight type you should consider getting is energy-efficient flat panel skylights to get multiple advantages with one product. You might decide between a deck-mount skylight for a lower profile or a curb-mount skylight if you have a flat or low-slope roof. Furthermore, choosing a venting skylight can provide both light and much-needed air circulation.
Safety Equipment and Tools to Install a Skylight
Safety remains a priority throughout the project. Protective footwear, harnesses, and stable ladders reduce risk when working at height. Reliable roofing practices protect workers and surrounding materials alike.
Using the correct tools improves efficiency and accuracy. Power tools, measuring devices, and sealing materials all contribute to a successful installation. Following safety instructions helps maintain control and prevent delays. Always read the manufacturer’s instructions carefully before you install the unit.
Rough Opening Preparation and Measurements
Power drills, circular saws, and a chalk line tool are some of the multiple tools and equipment you need to bring to use when installing the skylight. You can also check the skylight’s instructions manual to determine the critical things necessary to install it. During this phase, your roofer frames the rough opening to ensure the skylight frame will fit perfectly.
Steps to Install on a Shingle Roof
Once preparation is complete, the skylight frame can be positioned. Workers slowly place it into the rough opening, checking alignment before securing it. Correct placement prevents shifting and maintains structural balance. Each installation step builds on the previous one to ensure a watertight skylight.
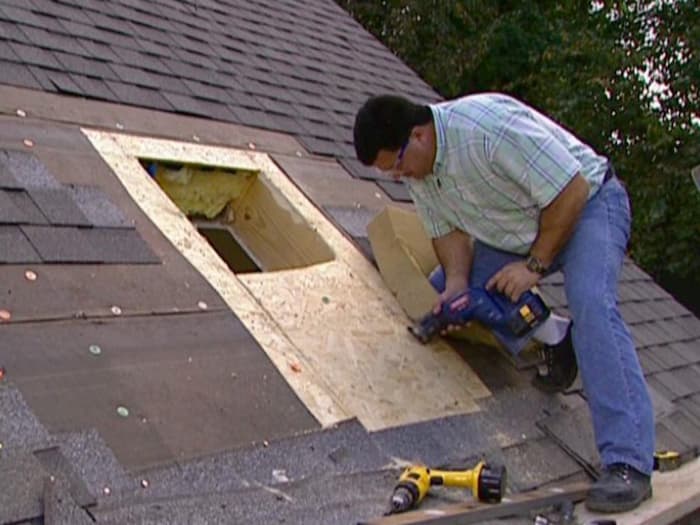
Step 1: Create the Roof Opening
The first step in how to install a skylight on a shingle roof is by cutting a rough opening through the layers of your shingle roof. It’s ideal to do the installation under clear skies to prevent rainwater from going inside your building while the shingle roof is compromised. Once you have the perfect weather, measure your skylight’s dimensions and use those precise measurements to cut the rough opening.
You have to place the skylight carefully between joists and install the proper head joists to support the window unit properly. After marking the skylight’s rough opening, drill four long deck screws on the four corners of the marking. You have to do the marking and drilling on the roof’s interior side so that you can use the protruding screws as a guide when you start cutting the shingle roof from the exterior side.
Step 2: Install Flashing at the Sill
The second step is installing flashing throughout the window sill to create a barrier that prevents leaks. You have to apply self-adhesive flashing on every side to install it properly. This initial flashing install is the most critical part of the weatherproofing. Next is cutting to fold the edge over to make the barrier the same width as the skylight sill. Lastly, nail down the sides with your hammer or nail gun.
Step 3: Place the Skylight
Step three is to place the skylight on your rough opening. You will require two or more people to lay down the skylight gently. You can also use a pulley system if you and your workers find the skylight too heavy to lift. After you place the skylight , you have to use 1.25” roofing nails to secure it.
Step 4: Seal the Edges
Make sure you seal the skylight’s sides effectively by cutting a self-adhesive membrane to stick on the flanges. A good tip is to let the membrane extend out of the edge a few inches to prevent water or moisture from going in. This seal is part of the overall flashing system that keeps your home dry.
Step 5: Position Sill Flashing
Most skylights you purchase will include a u-shaped flashing to place on the bottom sill. You can slide it in place with ease and secure each side by nailing them. You can finally install the shingles back to their original positions while covering the sill flashing.
Step 6: Install Step Flashing
If your commercial building has a slanting pitched roof, you will need to place step flashing on the skylight’s sides. You should start by installing the step flashing from the bottom and work your way up. Once you install the first step flashing , you have to place the other pieces by overlapping the previous shingle by several inches.
Step 7: Install Counter and Saddle Flashing
You can install the counter flashing easily since it only clicks into place when putting the step flashing on every side. Next is to install the saddle flashing that you will place on top, similar to a sill flashing. Install the saddle flashing with roofing nails and put back the shingles over the saddle flashing to finish the job.
Hopefully, you can follow the seven steps mentioned above to install your skylight correctly. Make sure you don’t miss a step to avoid creating issues with your skylight.